Meet Me at the Pumpkin Patch
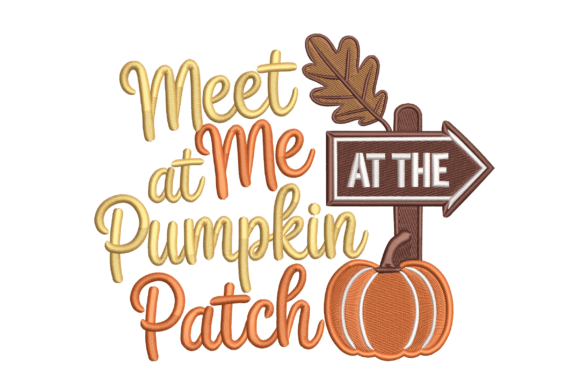
As a designer who’s stitched hundreds of holiday-themed embroidery files for clients, craft businesses, and my own Etsy shop, I opened Meet Me at the Pumpkin Patch expecting charm—and got something more: quiet intention. It’s not just festive; it’s thoughtful. The rustic wooden signpost, slightly weathered in silhouette, points left with gentle authority, while the pumpkin nestles close—not competing, but conversing. There’s no clutter, no forced whimsy. Just warmth, clarity, and that unmistakable autumn hush you feel when stepping into a sun-dappled patch at mid-morning.
A Tote Bag That Feels Like a Memory
Last week, I used Meet Me at the Pumpkin Patch on a natural canvas tote for a local boutique’s Thanksgiving launch. Not as a centerpiece—but centered low on the front panel, sized to 3.8 inches wide. Why that spot? Because it leaves room for the hand-stitched “Est. 2023” tag below and keeps the design legible after repeated washes and daily use. The signpost’s clean lines held up beautifully on the medium-weight fabric, and the pumpkin’s subtle texture—likely built from layered fill stitch with light satin accents—gave depth without density. Customers didn’t just notice it; they paused. One said, “It makes me want to call my sister and plan a trip.” That’s the power of restraint done right.
Where This Design Earns Its Keep
Meet Me at the Pumpkin Patch isn’t a one-trick file. It works across real-world applications—but only where its personality is honored:
- Custom apparel: On a cream crewneck sweatshirt, it reads like heirloom quality—especially with matte cotton thread. Avoid tight-knit polyester blends unless you’ve tested stabilizer pairing first.
- Embroidered patch: Perfectly scaled for a 2.5–3 inch border, it stitches cleanly with minimal jump threads. Ideal for attaching to denim jackets or baby overalls.
- Baby embroidery: Used on a gauzy muslin burp cloth (with tear-away + lightweight cutaway stabilizer), the design stayed soft and safe—no stiff backing peeking through.
- Holiday embroidery for small shops: I’ve seen it shine on tea towels, pillow covers, and aprons—always placed where the signpost’s directionality guides the eye naturally, not fights the grain.
- Digital embroidery file buyers: It’s strong as a standalone asset. Clean vector-based outlines mean easy resizing in editing software, and the balanced negative space makes it ideal for printable mockups.
Where Caution Lives
This design doesn’t scream “universal fit.” Its quiet strength means it can falter if mismatched:
- Small hoop sizes: Below 4x4 inches, the signpost lettering risks losing definition. If you’re stitching on a curved cap visor, test first—the angle compresses fine details.
- Textured or stretchy fabric: On terry cloth towels or ribbed knit onesies, the pumpkin’s curves may blur without proper topping (like water-soluble stabilizer) and reduced top tension.
- Dark fabric: The design relies on contrast. On charcoal or navy, avoid light beige thread—it fades visually. Go warm taupe or burnt orange instead.
- Tiny lettering & dense areas: The “Pumpkin Patch” text is elegant, not oversized. Don’t shrink it past 2.2 inches wide—running stitch outlines start to merge, and readability drops.
What It Does for Your Craft Business
For Etsy sellers and small shop owners, Meet Me at the Pumpkin Patch adds quiet credibility. It doesn’t shout “sale!”—it invites trust. When customers see this on a handmade apron or personalized baby blanket, they register care: in spacing, in proportion, in how the signpost leans *just so*. That translates directly to perceived value. I’ve priced items featuring this design 12–18% higher than similar generic fall motifs—and kept conversion steady. Why? Because it feels curated, not canned.
It also supports brand consistency. Whether you sell modern farmhouse kitchen goods or cozy nursery decor, Meet Me at the Pumpkin Patch slots in without demanding a full seasonal rebrand. It’s versatile enough for Thanksgiving, but soft enough to linger into early December—no jarring thematic whiplash.
Designer Notes You’ll Actually Use
Before stitching your first Meet Me at the Pumpkin Patch project, do these five things:
- Run a test on scrap fabric matching your final substrate—especially if using textured, dark, or stretchy material.
- Check thread color contrast in natural light *and* under warm bulb light. What reads warm on screen may look muddy in person.
- Review stitch density in your editing software. If fill areas feel heavy for your fabric weight, reduce density by 5–7%—not more.
- Confirm hoop size compatibility. This design likely fits comfortably in a 5x7, but verify before hooping expensive garments.
- Inspect corners and inner curves at 200% zoom. Look for stray trims or nested stitches that could snag during wear or washing.
Also: test it in black-and-white mockups. A great embroidery file holds up even without color context—this one does. And always double-check licensing terms before listing finished products or reselling the digital embroidery file. Commercial use isn’t assumed, even for holiday themes.
Final Thought: It’s Not Just Autumn—It’s Invitation
What makes Meet Me at the Pumpkin Patch stand out isn’t pumpkin count or stitch count—it’s emotional precision. It doesn’t decorate an item; it extends an invitation. That’s rare in machine embroidery design, where busyness often masquerades as charm. Use it where warmth matters more than wow. On a gift for a new parent. On a shop apron that says “we grow things here.” On a tote bag handed out at a harvest festival booth. In those moments, Meet Me at the Pumpkin Patch doesn’t just stitch—it connects.