Spooky Season
A Practical Embroidery Designer’s Review for Small Business Merchandise
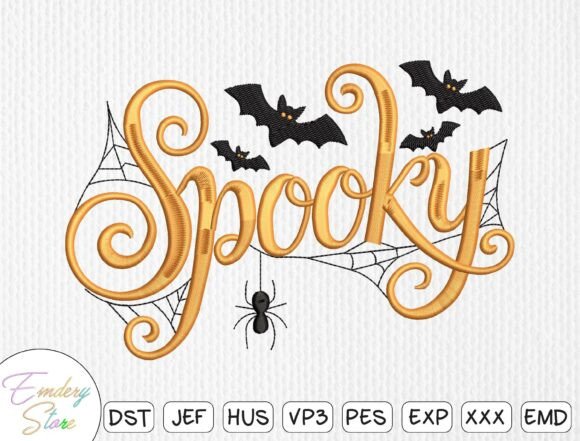
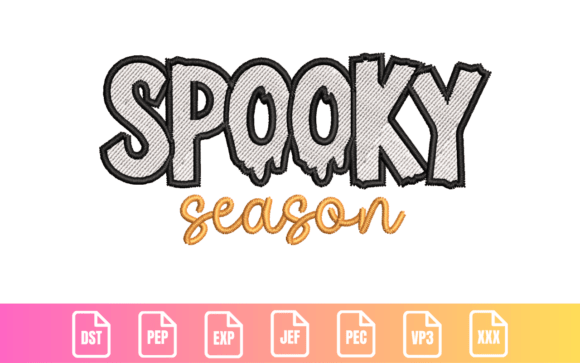
As an embroidery designer who’s developed hundreds of commercial designs for cafés, boutiques, bakeries, pet brands, and handmade studios, I approach every new machine embroidery design with two questions: Does it communicate brand intent clearly? and Will it hold up in real-world production? When I first saw Spooky Season, my immediate impression was “playful but purpose-built”—not just a decorative Halloween motif, but a versatile branding tool. The blend of bold spooky lettering with a relaxed script strikes that rare balance: festive without feeling juvenile, spirited without sacrificing professionalism.
First Impression: Friendly Authority with Seasonal Charm
Spooky Season reads as warm, confident, and intentionally crafted—not generic clipart repurposed for embroidery. That matters deeply when your small business merch serves as a silent salesperson. Whether stitched on a florist’s apron or a pet boutique’s tote bag, the design conveys approachability and seasonal relevance without leaning into cartoonish tropes. It feels handmade, yes—but also intentional, like part of a considered design system. For Etsy sellers or craft studios, that distinction builds trust. Customers don’t buy “Halloween stuff”; they buy your version of Halloween—curated, consistent, and confidently yours.
Where Spooky Season Excels in Real Business Use
- Embroidered patches: Works beautifully as a sew-on or iron-on patch for staff jackets, product packaging accents, or limited-edition customer gifts. Its balanced letterforms avoid overcrowding at 2.5”–3.5” sizes.
- Staff uniforms & aprons: Ideal for chest placement on café or bakery aprons—large enough to read, soft enough not to dominate. The script element adds personality; the bold caps ensure legibility from across a counter.
- Cap embroidery: Fits cleanly on front panels of structured caps (especially low-profile twills or cotton blends), provided spacing and stitch density are verified before hooping.
- Tote bag design & custom apparel: Scales well to 4”–5” widths on canvas or duck cloth. The contrast between bold and script elements creates visual rhythm that stands out on retail shelves or market booths.
- Boutique merchandise & event merch: Perfect for seasonal pop-ups, local festivals, or holiday markets—where quick recognition and cohesive branding drive repeat engagement.
Where to Proceed Thoughtfully
While Spooky Season is highly adaptable, its dual-weight typography means certain applications require extra attention:
- Small patch sizes (<2”): The script portion may lose definition. Always test stitch-out at intended size—don’t rely on screen previews alone.
- Curved surfaces (e.g., cap fronts, sleeves): Ensure proper underlay and stabilizer choice—especially on lightweight or stretchy fabrics—to prevent distortion of the script’s delicate curves.
- Dark uniforms or textured fabric: Thread color contrast becomes critical. Test black thread on navy twill, or navy on charcoal—heavy textures can mute fine details.
- Frequent washing (e.g., restaurant aprons, pet gear): Confirm stitch density isn’t overly dense in tight curves—excess density increases wear risk over time.
How Spooky Season Strengthens Brand Identity
In small business merch, consistency compounds impact. A single strong design like Spooky Season used across aprons, tote bags, staff caps, and even printable mockups for social media creates visual continuity customers subconsciously recognize. It signals that your brand pays attention—not just to trends, but to execution. That perception elevates perceived value: a handmade bakery using Spooky Season on seasonal cookie packaging feels more intentional than one slapping on a stock graphic. For Etsy sellers, that polish translates directly to higher conversion and repeat buyers. And because it’s rooted in seasonal relevance—not fleeting novelty—it supports long-term asset reuse year after year, with minimal refresh needed.
Practical Embroidery Designer Notes for Production
Before sending Spooky Season to your embroidery machine or digitizing partner, run through this checklist:
- Test stitch it in black and white first—this reveals spacing issues, thread tension traps, and legibility gaps invisible on screen.
- Verify how it renders at your smallest intended patch size (e.g., 1.75”)—does the script remain readable? Adjust if needed.
- Review thread color contrast against your base fabric—especially for dark or heathered textiles.
- Inspect letter spacing and kerning—tight spots between “S” and “p” or “k” and “y” can cause nesting or skipped stitches.
- Confirm hoop size compatibility—some script-heavy designs require larger hoops for smooth hooping and reduced re-hooping.
- Test on your actual production fabric with appropriate stabilizer—cutaway for knits, tear-away for stable wovens, fusible for lightweight linens.
- Create a physical or digital mockup for client approval—especially important for branded patches or uniform rollouts.
- Compare Spooky Season beside your other design assets—is it visually aligned in weight, tone, and scale?
- Double-check commercial licensing terms before using it on products for resale—this is non-negotiable for small business merch, Etsy shops, and wholesale partners.
Remember: a great digital embroidery file is only as strong as its execution. Spooky Season gives you expressive flexibility—but smart prep ensures your finished product reflects the care your brand represents. Whether you’re stitching it onto a florist’s harvest-themed tote or a pet studio’s trick-or-treat bandana, this design doesn’t just say “Halloween.” It says “We made this for you—and we meant it.”